

How To Install Java Command Line
Introduction
Java is one of the almost popular programming languages. It is used for developing anything from lightweight mobile to desktop applications.
This step-past-pace guide will show you how simple information technology is to install Coffee on Ubuntu eighteen.04 or xx.04.
Prerequisites
- A user account with sudo privileges
- Access to the command-line/last window
- The apt (apt-get) control
Java Versions
There are iv Java platforms bachelor:
- Java Standard Edition (Coffee SE)
- Coffee Micro Editions (Java ME)
- Coffee Enterprise Edition (Java EE)
- JavaFX
In this document, we expect at unlike packages within the Coffee SE.
The Ubuntu repository offers two (2), open-source Coffee packages, Java Development Kit (Open JDK) and Java Runtime Environment (Open JRE). You utilise JRE for running Coffee-based applications, while JDK is for developing and programming with Coffee.
As well available is Oracle Java, another SE implementation, which has additional commercial features. You can find the official Oracle JDK through a third-party repository. Even so, comport in mind the license just allows non-commercial use of the software.
Installing Java on Ubuntu
You lot can install one or several Java packages. Yous can likewise decide which version you want on your arrangement past installing a specific version number. The current default and LTS version is Java 11.
Install OpenJDK
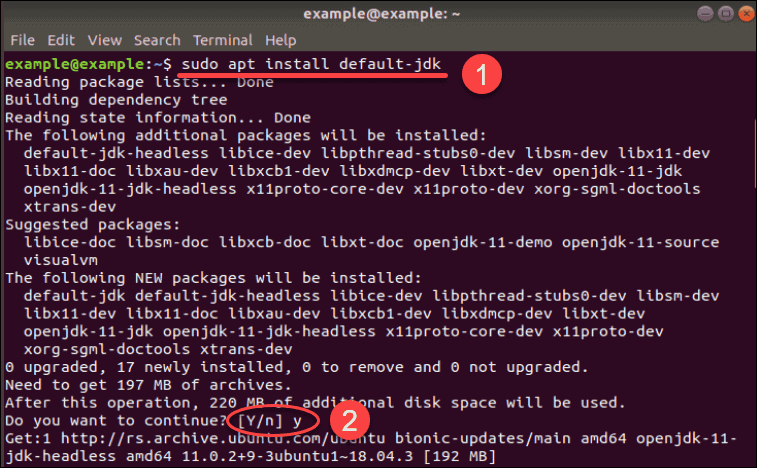
1. Open the terminal (Ctrl+Alt+T) and update the package repository to ensure you download the latest software version:
sudo apt update two. Then, you tin can confidently install the latest Java Evolution Kit with the post-obit command:
sudo apt install default-jdk 3. Confirm the installation by typing y (yes) and press Enter.
Install OpenJRE 11
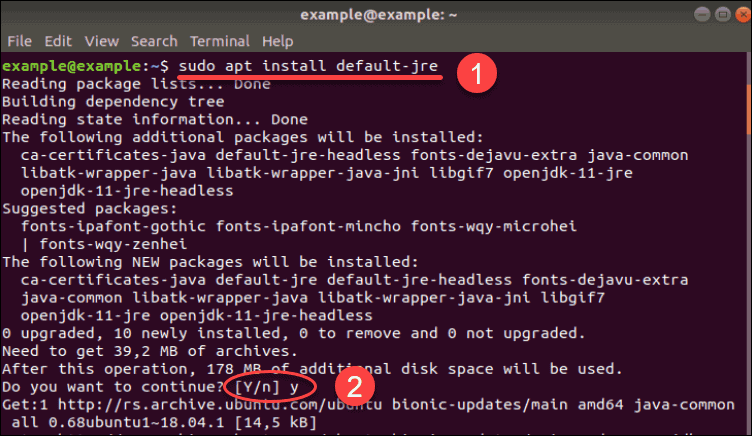
1. Earlier you install the Java Runtime Environs, make sure you update the repository with:
sudo apt update 2. Adjacent, type in the following command to download and install Java RE:
sudo apt install default-jre Type y (yes) and press Enter to ostend the installation.
Install Oracle Coffee 11
To download the official Oracle JDK, you kickoff demand to download a 3rd-party repository.
We include instructions for installations from 2 (two) dissimilar package repositories. You lot can decide from which one you adopt to download.
Option one: Download Oracle Java from Webupd8 PPA
1. Showtime, add the required bundle repository by typing:
sudo add together-apt-repository ppa:webupd8team/java Striking Enter when prompted.
2. Brand sure to update your system before initiating any installation:
sudo apt update 3. Now, you can install Coffee xi, the latest LTS version:
sudo apt install oracle-java11-installer 4. Optionally, you can set this Java version as the default with the post-obit command:
sudo apt install oracle-java11-set-default Selection ii: Download Oracle Java from Linux Uprising PPA
1. Before adding the new repository, install the required packages if y'all do not have them on your organization still:
sudo apt install software-properties-common 2. Next, add the repository with the following command:
sudo add-apt-repository ppa:linuxuprising/java 3. Update the packet listing before installing whatsoever new software with:
sudo apt update iv. And then, download and install the latest version of Oracle Java (version number eleven):
sudo apt install oracle-java11-installer Verify Java is Installed on Your System
Now verify whether the software is part of your system.
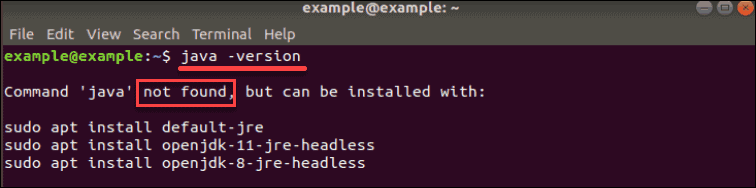
To check the version of Java running, utilize the command:
java –version The successful installation of Java on Ubuntu will output details, equally in the image beneath.

If there is no Coffee version, the arrangement will say it is unable to find the software.
Install Specific Version of Coffee
If for some reason yous do not wish to install the default or latest version of Coffee, you lot can specify the version number you prefer.
Install Specific Version of OpenJDK
You may decide to use Open up JDK 8, instead of the default OpenJDK xi.
To exercise so, open up the concluding and type in the following command:
sudo apt install openjdk-viii-jdk 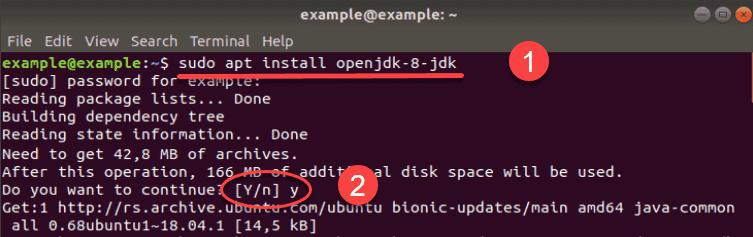
Verify the version of coffee installed with the command:
coffee –version 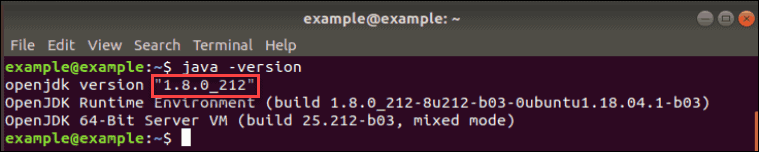
Install Specific Version of Oracle Java
When you lot download the Oracle Java packages from a third-party repository, you lot have to type out the version number equally part of the lawmaking.
Therefore, if you want other versions of Java Oracle on your system, modify that number appropriately.
The command for installing Oracle JDK is the following (the symbol # representing the Java version):
sudo apt install oracle-coffee#-installer For example, if you want to install Java 10, use the command:
sudo apt install oracle-java10-installer 
How to Set Default Coffee Version
As y'all tin can take multiple versions of Java installed on your system, you tin decide which 1 is the default one.
First, run a command that shows all the installed versions on your computer:
sudo update-alternatives --config coffee 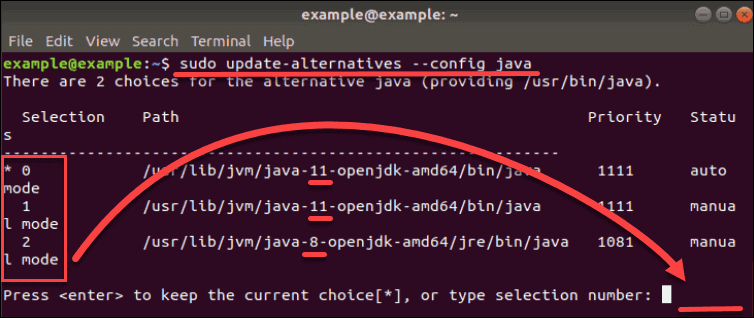
The epitome higher up shows that there are two alternatives on this system. These choices are represented past numbers 1 (Java eleven) and 2 (Java 8), while the 0 refers to the current default version.
As the output instructs, you can alter the default version if you type its associated number (in this case, 1 or 2) and press Enter.
How to Set JAVA_HOME Environment Variable
The JAVA_HOME environment variable determines the location of your Coffee installation. The variable helps other applications access Coffee'south installation path easily.
1. To prepare the JAVA_HOME variable, you starting time need to notice where Java is installed. Utilise the following control to locate information technology:
sudo update-alternatives --config java 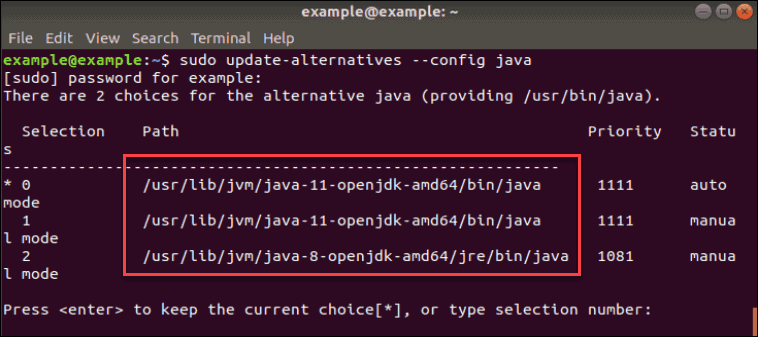
The Path section shows the locations, which are in this case:
- /usr/lib/jvm/java-xi-openjdk-amd64/bin/java (where OpenJDK eleven is located)
- /usr/lib/jvm/coffee-eight-openjdk-amd64/jre/bin/java (where OpenJDK 8 is located)
2. In one case yous meet all the paths, copy one of your preferred Java version.
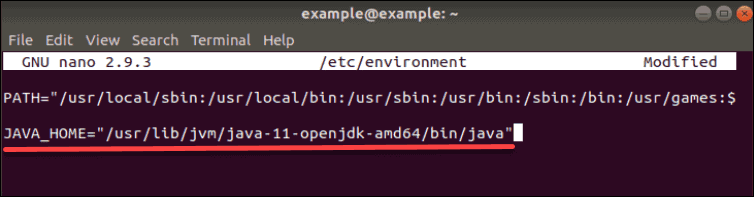
three. So, open the file /etc/environment with any text editor. In this example, we employ Nano:
nano /etc/environment iv. At the end of the file, add a line which specifies the location of JAVA_HOME in the following manner:
JAVA_HOME="/your/installation/path/" For example, if nosotros copied the installation path for Java xi in the previous step, the added line in the text lawmaking editor would be:
How to Uninstall Java on Ubuntu
In case you need to remove whatsoever of the Java packages installed, use the apt remove command.
To remove Open up JDK 11, run the command:
sudo apt remove default-jdk To uninstall OpenJDK 8:
sudo apt remove openjdk-8-jdk Once you run the control, confirm the continuation of the process by pressing y (yes) and the packages volition be removed.
Note: Refer to our comprehensive breakdown of Best Java IDEs to find the best one for your needs.
Conclusion
This guide has shown you how to install Java on Ubuntu 18.04. It also instructed yous on how to change the default version and set the dwelling house environment variable.
Now, y'all are ready to use the powerful Coffee platform!
For more than tutorials on how to install Coffee on other systems, make sure to read our article on how to install Java on Windows.
Was this article helpful?
Yep No

Source: https://phoenixnap.com/kb/how-to-install-java-ubuntu
Posted by: waldensheophy83.blogspot.com
0 Response to "How To Install Java Command Line"
Post a Comment